Creating a Subdomain in cPanel
In this tutorial we will walk you through setting up a subdomain in cPanel.
Subdomains are used mainly to help divide your website's content into separate unique areas, without needing to register additional domains.
Subdomains function as a separate websites to your main website but share the same domain with a custom prefix, e.g. “mysubdomain.mywebsite.com”.
Most people use subdomains to serve unique content for their site, e.g. mobile versions, different languages, blogs, location-specific, etc.
For example, if you wanted to have an informational website, a forum, and an online shop, you might consider separating each of those using subdomains (e.g. www.mywebsite.com, forum.mywebsite.com, shop.mywebsite.com).
To create a subdomain, follow these steps:
- Log in to your cPanel account.
Follow this guide to learn how to access your cPanel account. - Under the Domains section, select “Subdomains”.
Tip: Use the quick search bar at the top of your cPanel account for speedy navigation.
- Select the “Create a New Domain” button (top right).

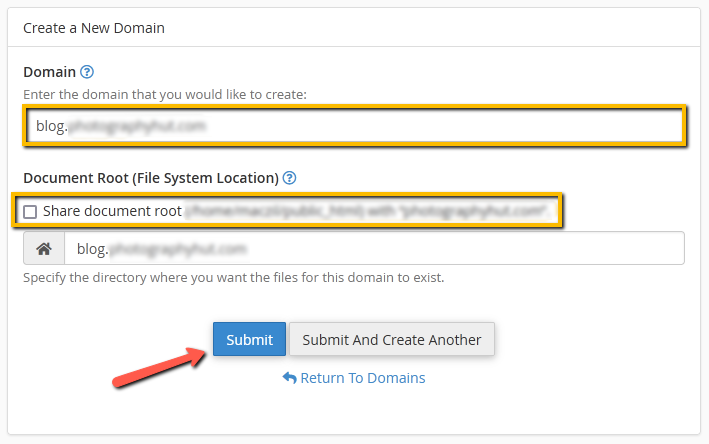
- Enter your subdomain prefix followed by the rest of your main domain (e.g. “blog.mywebsite.com”).
Uncheck the checkbox for sharing the document root (recommended). Finally, choose “Submit”.
If you do not uncheck the “Share document root” checkbox, the subdomain will display the same content as your main domain
(i.e. “blog.mywebsite.com” and “www.mywebsite.com” will show the exact same content).
Unchecking the checkbox will create a new directory for your subdomain’s files.
- Congratulations! You have now created a subdomain.
You can view your subdomain using: yoursubdomain.yourdomain.com.
You can add content to the subdomain’s folder and even set up email using your subdomain.
